A navigation bar is one of the most important parts of a website. It helps visitors move between pages, find information, and understand how a website is organized. Whether you are building a personal portfolio, a business website, a blog, or an online store, a clean and user-friendly header can make a big difference.
HTML and CSS provide everything you need to create a professional navigation bar. HTML defines the structure of the header and its links, while CSS controls the layout, colors, spacing, and visual effects.
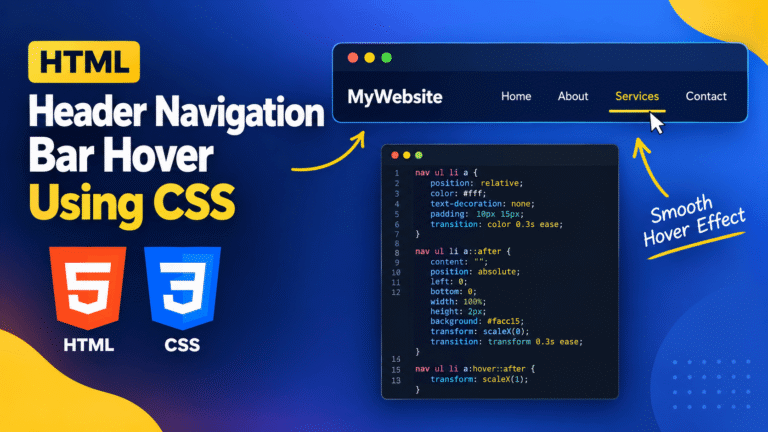
One popular way to improve a navigation menu is by adding a hover effect. When a user moves the mouse pointer over a navigation link, the link can change color, display an underline, or show a smooth animation. These small details make a website feel more interactive without requiring complicated JavaScript.
In this tutorial, we will build an HTML header navigation bar from scratch and add a smooth CSS hover effect using the :hover pseudo-class, the ::after pseudo-element, and the transition property. We will also explore alternative hover styles, responsive design, accessibility, common mistakes, and a complete example you can run directly in your browser.
Understanding the HTML Header and Navigation Elements
Before writing the CSS, let’s understand the HTML elements used to create a navigation bar.
A typical website header may contain a logo on the left and navigation links on the right. These links might include Home, About, Services, Blog, and Contact.
HTML provides semantic elements that help organize this structure:
<header>defines introductory content for a page or section.<nav>identifies a section containing navigation links.<ul>creates an unordered list of navigation items.<li>represents an individual list item.<a>creates a hyperlink that users can activate to navigate to another page or section.
Here is a basic HTML navigation bar:
<header class="site-header">
    <a href="#home" class="logo">MyWebsite</a>

    <nav aria-label="Main navigation">
        <ul class="nav-links">
            <li><a href="#home">Home</a></li>
            <li><a href="#about">About</a></li>
            <li><a href="#services">Services</a></li>
            <li><a href="#contact">Contact</a></li>
        </ul>
    </nav>
</header>
This code creates a logo and four navigation links. At this stage, the links have no custom styling, so the navigation bar may look different from the design you have in mind.
We can use CSS to position the logo and links, remove the default list bullets, adjust the spacing, and add interactive hover effects.
Styling the HTML Header with CSS
Let’s begin by creating a simple, modern header with a dark background and white navigation text.
Add the following CSS to your HTML file inside a <style> element, or place it in a separate stylesheet.
* {
    box-sizing: border-box;
}

body {
    margin: 0;
    font-family: Arial, sans-serif;
}

.site-header {
    display: flex;
    justify-content: space-between;
    align-items: center;
    padding: 18px 8%;
    background-color: #172554;
}

.logo {
    color: white;
    font-size: 24px;
    font-weight: bold;
    text-decoration: none;
}

.nav-links {
    display: flex;
    align-items: center;
    gap: 28px;
    list-style: none;
    margin: 0;
    padding: 0;
}

.nav-links a {
    color: white;
    font-size: 16px;
    text-decoration: none;
}
Understanding the CSS
The display: flex declaration arranges the logo and navigation area horizontally.
The justify-content: space-between property places the logo toward the left and the navigation menu toward the right.
The align-items: center property aligns the elements vertically.
The padding property adds space around the header content, while background-color gives the header its dark blue appearance.
Inside the navigation menu, list-style: none removes the default bullets. The gap: 28px declaration creates consistent spacing between the links.
Finally, text-decoration: none removes the default underline from the links, allowing us to create our own animated underline later.
Adding a Basic CSS Hover Effect
The simplest way to add a hover effect is to change a navigation link’s text color when the user points to it.
CSS provides the :hover pseudo-class for this purpose.
.nav-links a {
    color: white;
    text-decoration: none;
    transition: color 0.3s ease;
}

.nav-links a:hover {
    color: #facc15;
}
Here is what happens:
- The link normally appears white.
- When the pointer moves over it, the text changes to yellow.
- When the pointer moves away, the text returns to white.
- The
transitionproperty makes the color change gradual.
The 0.3s value represents three-tenths of a second, and ease controls how the transition progresses over time.
This is a simple but effective hover effect for navigation bars. It works particularly well when you want a minimal design that does not distract visitors from the page content.
However, if you want something more visually interesting, you can add an animated underline beneath each link.
Read more: HTML Header Navigation Bar Hover Using CSS: Complete Guide with Examples
Creating a Smooth Animated Underline
An animated underline is one of the most popular CSS navigation hover effects. Instead of displaying a permanent underline, the line expands beneath a link when the user hovers over it.
We can create this effect using the ::after pseudo-element and the transform property.
Use the following CSS for the navigation links:
.nav-links a {
    position: relative;
    display: inline-block;
    padding: 8px 0;

    color: white;
    text-decoration: none;

    transition: color 0.3s ease;
}

.nav-links a::after {
    content: "";
    position: absolute;
    left: 0;
    bottom: 2px;

    width: 100%;
    height: 2px;

    background-color: #facc15;

    transform: scaleX(0);
    transform-origin: left;
    transition: transform 0.3s ease;
}

.nav-links a:hover {
    color: #facc15;
}

.nav-links a:hover::after {
    transform: scaleX(1);
}
How the Animated Underline Works
The position: relative declaration on the link establishes a positioning reference for the underline.
The ::after pseudo-element creates a decorative element after the link’s text. Since content: "" is used, it does not add any visible text.
The underline is positioned at the bottom of the link using position: absolute and bottom: 2px.
Initially, transform: scaleX(0) reduces its horizontal scale to zero, making it invisible. When the user hovers over the link, transform: scaleX(1) expands the underline to its full width.
The transition: transform 0.3s ease declaration makes the line expand smoothly.
The transform-origin: left property determines the starting point of the animation. You can change it to right to make the underline expand from the opposite direction.
This approach creates a clean animation without changing the layout of the navigation items.
Creating Different Navigation Bar Hover Effects
The animated underline is only one option. Depending on your website’s design, you may prefer a background color change, a border effect, or a small movement animation.
A. Background Color Hover Effect
This style gives the navigation link a colored background when the user hovers over it.
.nav-links a {
    display: inline-block;
    padding: 10px 14px;
    color: white;
    text-decoration: none;
    border-radius: 6px;

    transition:
        background-color 0.3s ease,
        color 0.3s ease;
}

.nav-links a:hover {
    background-color: #facc15;
    color: #172554;
}
The padding makes the clickable area more comfortable, while the rounded corners give the link a button-like appearance.
This design works well for dashboards, business websites, and navigation menus where clear interaction feedback is important.
B. Bottom Border Hover Effect
If you prefer a straightforward effect, you can animate a bottom border.
.nav-links a {
    display: inline-block;
    padding: 8px 0;
    color: white;
    text-decoration: none;
    border-bottom: 2px solid transparent;

    transition:
        color 0.3s ease,
        border-color 0.3s ease;
}

.nav-links a:hover {
    color: #facc15;
    border-bottom-color: #facc15;
}
The border is transparent by default and becomes yellow on hover.
This method is easy to understand and maintain. Because the border exists in both states, it avoids the vertical layout shift that can occur when a border is added only on hover.
C. Slight Movement Hover Effect
You can also move a navigation link upward slightly when the user hovers over it.
.nav-links a {
    display: inline-block;
    color: white;
    text-decoration: none;

    transition:
        color 0.3s ease,
        transform 0.3s ease;
}

.nav-links a:hover {
    color: #facc15;
    transform: translateY(-3px);
}
The translateY(-3px) declaration moves the link upward by three pixels.
This creates a subtle movement effect, but it should be used carefully. Too much movement can make navigation feel distracting or unstable.
For a professional website, a color change combined with a small underline animation is often enough.
Complete HTML and CSS Code
Now let’s put everything together into a complete working example. This version includes a dark header, a logo, navigation links, a yellow animated underline, responsive spacing, and keyboard focus styles.
Create a file called index.html, paste the following code, and open it in your browser.
<!DOCTYPE html>
<html lang="en">
<head>
    <meta charset="UTF-8">
    <meta name="viewport" content="width=device-width, initial-scale=1.0">

    <title>HTML Header Navigation Bar Hover Using CSS</title>

    <style>
        * {
            box-sizing: border-box;
        }

        html {
            scroll-behavior: smooth;
        }

        body {
            margin: 0;
            font-family: Arial, sans-serif;
            color: #222;
        }

        .site-header {
            display: flex;
            justify-content: space-between;
            align-items: center;
            gap: 24px;

            padding: 18px 8%;
            background-color: #172554;
        }

        .logo {
            color: white;
            font-size: 24px;
            font-weight: bold;
            text-decoration: none;
            white-space: nowrap;
        }

        .nav-links {
            display: flex;
            align-items: center;
            flex-wrap: wrap;
            gap: 24px;

            list-style: none;
            margin: 0;
            padding: 0;
        }

        .nav-links a {
            position: relative;
            display: inline-block;
            padding: 8px 0;

            color: white;
            text-decoration: none;
            font-size: 16px;

            transition: color 0.3s ease;
        }

        .nav-links a::after {
            content: "";
            position: absolute;
            left: 0;
            bottom: 2px;

            width: 100%;
            height: 2px;
            background-color: #facc15;

            transform: scaleX(0);
            transform-origin: left;
            transition: transform 0.3s ease;
        }

        .nav-links a:hover,
        .nav-links a:focus-visible {
            color: #facc15;
        }

        .nav-links a:hover::after,
        .nav-links a:focus-visible::after {
            transform: scaleX(1);
        }

        .logo:focus-visible,
        .nav-links a:focus-visible {
            outline: 2px solid #facc15;
            outline-offset: 5px;
        }

        main {
            padding: 80px 8%;
            text-align: center;
        }

        main h1 {
            color: #172554;
        }

        main p {
            line-height: 1.7;
        }

        section {
            padding: 50px 8%;
            scroll-margin-top: 20px;
        }

        @media (max-width: 600px) {
            .site-header {
                flex-direction: column;
                align-items: flex-start;
                padding: 18px 5%;
            }

            .nav-links {
                gap: 12px 18px;
            }
        }

        @media (prefers-reduced-motion: reduce) {
            html {
                scroll-behavior: auto;
            }

            .nav-links a,
            .nav-links a::after {
                transition: none;
            }
        }
    </style>
</head>
<body>

    <header class="site-header">
        <a href="#home" class="logo">MyWebsite</a>

        <nav aria-label="Main navigation">
            <ul class="nav-links">
                <li><a href="#home">Home</a></li>
                <li><a href="#about">About</a></li>
                <li><a href="#services">Services</a></li>
                <li><a href="#contact">Contact</a></li>
            </ul>
        </nav>
    </header>

    <main id="home">
        <h1>Welcome to MyWebsite</h1>
        <p>
            Explore our website using the navigation menu above.
            Hover over a link to see the animated underline.
        </p>
    </main>

    <section id="about">
        <h2>About Us</h2>
        <p>Learn more about our website and what we do.</p>
    </section>

    <section id="services">
        <h2>Our Services</h2>
        <p>Explore the services we offer.</p>
    </section>

    <section id="contact">
        <h2>Contact Us</h2>
        <p>Get in touch with our team.</p>
    </section>

</body>
</html>
Understanding the Complete Example
The HTML creates a semantic header and navigation area. Each link points to a section on the same page, so clicking a link takes the user to its corresponding destination.
The CSS uses Flexbox to arrange the logo and navigation menu. The animated underline is created with ::after, while :hover and :focus-visible apply the interactive styling.
The media query adjusts the header for smaller screens, allowing the logo and navigation links to stack vertically. The reduced-motion media query disables the transitions for users who have requested less motion.
This example uses only HTML and CSS. You do not need a JavaScript library or framework to create the hover effects.
Making the Navigation Bar Responsive
A navigation bar that looks good on a desktop monitor may not fit comfortably on a mobile screen. Responsive design helps your header adapt to different viewport sizes.
For a small menu, Flexbox and a media query may be sufficient:
@media (max-width: 600px) {
    .site-header {
        flex-direction: column;
        align-items: flex-start;
        gap: 16px;
    }

    .nav-links {
        flex-wrap: wrap;
        gap: 12px 18px;
    }
}
This stacks the logo and navigation menu vertically and allows links to wrap when needed.
For larger menus, a collapsible mobile navigation menu may be a better choice. That usually requires a button and additional interaction logic to open and close the menu accessibly.
Remember that hover is primarily a pointer interaction. Touchscreen users may not have the same hover behavior, so all essential navigation links should remain usable without hovering.
Common Mistakes and How to Fix Them
Even a small CSS navigation menu can behave unexpectedly if selectors, positioning, or transition rules are incorrect.
Mistake 1: Forgetting the Colon in :hover
Incorrect:
.nav-links a hover {
    color: yellow;
}
Correct:
.nav-links a:hover {
    color: yellow;
}
The colon is necessary because :hover is a CSS pseudo-class.
Mistake 2: Using Different Class Names
If your HTML uses class="nav-links" but your stylesheet targets .navbar-links, the intended styles will not apply.
Check that the class names match exactly in both files.
Mistake 3: Forgetting position: relative
An absolutely positioned underline needs the correct positioning reference.
.nav-links a {
    position: relative;
}
Without it, the underline may be positioned relative to a different ancestor.
Mistake 4: Expecting a Transition to Create the Hover Effect
A transition controls how a property changes; it does not define the new value itself.
.nav-links a {
    color: white;
    transition: color 0.3s ease;
}

.nav-links a:hover {
    color: yellow;
}
The hover rule changes the color, while the transition makes the change gradual.
Mistake 5: Making the Hover Animation Too Slow
A very slow effect can make the navigation feel sluggish. For a simple color or underline animation, try a duration between 0.2s and 0.4s and adjust it to suit your design.
Mistake 6: Relying Only on Hover
Hover alone is not sufficient for keyboard users and may behave inconsistently on touchscreens.
Provide visible keyboard focus styles and ensure that links remain functional without a mouse.
Best Practices for Professional Navigation Design
A good navigation bar should be attractive, accessible, and easy to use.
Keep the menu simple. Use clear labels such as Home, About, Services, and Contact. Too many top-level links can overwhelm visitors.
Maintain consistent spacing. The gap property in Flexbox helps keep the navigation items evenly spaced.
Use readable colors. Make sure text contrasts sufficiently with the header background. WCAG guidance generally calls for a contrast ratio of at least 4.5:1 for normal-sized text.
Provide keyboard focus indicators. Keyboard users need to see which link is currently focused. Do not remove focus outlines without replacing them with a visible alternative.
Keep hover effects subtle. A small color change or animated underline is often enough to communicate interactivity.
Make the menu touch-friendly. Use adequate spacing and comfortable clickable areas for mobile devices.
Respect reduced-motion preferences. Avoid unnecessary movement for people who have requested reduced animation.
Use semantic HTML. Elements such as <header>, <nav>, and <a> help make the page structure meaningful to browsers and assistive technologies.
Test on different screen sizes. Check that the header does not overlap, links do not become clipped, and the navigation remains usable on smaller displays.
Frequently Asked Questions
How do I create a hover effect on an HTML navigation bar?
Use the CSS :hover pseudo-class to change a link’s color, background, border, or other visual properties when a pointing device moves over it.
How do I create an animated underline in CSS?
Use the ::after pseudo-element to create a line beneath the link. Then animate its transform property from scaleX(0) to scaleX(1) when the link is hovered or focused.
What is the difference between :hover and ::after?
:hover selects an element in its hover state. ::after creates a generated content box that can be styled as a decorative element, such as an animated underline.
Do I need JavaScript for a navigation bar hover effect?
No. CSS can handle color changes, animated underlines, background transitions, and simple movement effects. JavaScript may be necessary for more complex interactions, such as a collapsible mobile menu.
How do I change the background color of the header?
Target the header class and use the background-color property:
.site-header {
    background-color: #172554;
}
Replace the hexadecimal value with your preferred CSS color.
Why is my CSS hover effect not working?
Check the spelling of your class names, the syntax of your selector, and whether the stylesheet is correctly connected. Browser developer tools can help you identify conflicting CSS rules.
Can CSS hover effects work on mobile devices?
Touchscreens do not provide the same persistent hover interaction as a mouse. Essential navigation should work without hover, and keyboard focus styles should also be provided.
What is a suitable transition duration for navigation links?
A duration of around 0.2s to 0.4s is a useful starting point for simple hover effects. The best duration depends on the overall design.
Does a navigation hover effect improve SEO?
A hover effect does not directly guarantee better search rankings. However, clear navigation, descriptive links, accessible design, and a well-organized website can improve usability and help search engines understand site structure.
At the end:
Creating an HTML header navigation bar with CSS hover effects is a practical skill for anyone learning frontend development. HTML provides the structure, while CSS controls the layout, colors, spacing, and interactive appearance.
By combining Flexbox, the :hover pseudo-class, the ::after pseudo-element, and CSS transitions, you can create a navigation bar with smooth color changes and animated underlines. You can also adapt the design for mobile screens and add visible focus indicators for keyboard users.
Start with a simple header, test one hover effect, and then customize the colors, spacing, and animation speed to match your website. With a little practice, you can create a navigation bar that looks professional while remaining easy to use and maintain.